
Initial project set up:
- We are using the extension ‘Azure Logic App Tools for Visual Studios’.
- We created a new project > Azure Resource Group > Logic App.
- We are looking to populate the contents of LogicApp.json.
Moving from the Azure Portal to VS: Sometimes LogicApps gets created in the Azure Portal instead of being developed in Visual Studios. This can lead to issues when we want to check in the LogicApps to source control. There is no quick way to convert a LogicApp from the Azure Portal to one in VS. The “code view” being copied and pasted does not return the correct format in VS and will therefore stop the deployment from taking place. Here are the work around steps:
- We will need to:
Download LogicAppTemplate with the following command in PowerShell: Install-Module -Name LogicAppTemplate -
- Download scoop:
- In PowerShell (non-admin) run these two separate commands:
- Download scoop:
> Set-ExecutionPolicy RemoteSigned -Scope CurrentUser # Optional: Needed to run a remote script the first time
> irm get.scoop.sh | iex
- Use scoop to download armclient. Run in PowerShell:
scoop install armclient
- Once we have everything installed we need to make an armclient request in order to login to Azure.
armclient GET /subscriptions?api-version=2014-04-01
- If you log in with the wrong account you can run the following command to clear the cache and log in again:
-
armclient clearcache
- After we are authenticated we can run the following:
-
armclient token $SubscriptionId | Get-LogicAppTemplate -LogicApp MyApp -ResourceGroup MyRG -SubscriptionId $SubscriptionId -Verbose | Out-File C:\template.json
- This will output an ARM (Azure Resource Manager) deploy template. This file will match the format of our LogicApp in Visual Studio. We can copy and paste the contents of the file to our LogicApp.json file to check in.
Deployment process:
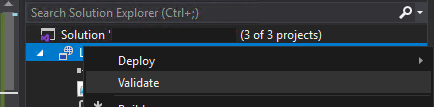
- Right click the project and click ‘Deploy’
- Select the resource group you wish to deploy to. The deployment template and parameters should auto populated
- Open the Parameters and verify the values are appropriate.
- Click Deploy, review the values again and click Save.
- This will open up a local PowerShell window. Here you will be promoted to enter encrypted connection fields such as user names and passwords used by the LogicApp.
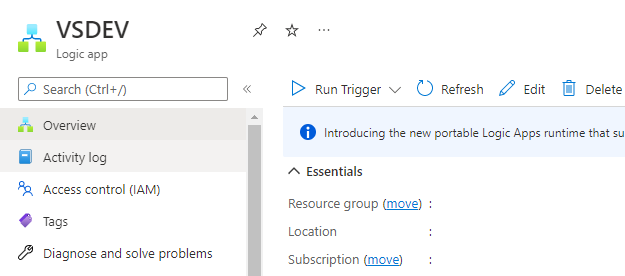
- Finally the Logic app will be deployed and you can view the end result in the Azure Portal. Make sure to test and check the LogicApp to ensure the parameters were configured correctly during the deployment.
Check in process:In the Visual Studio Solution Explorer, right click the solution and click ‘Add Solution to Source Control…’.
Select the location in source control where the solution should be located.Go to Team Explorer > Pending Changes. Change the view options to ‘Show solution changes’. Check in the objects to source control just like any other D365 development, making sure to apply the correct comments and reference the applicable ADO items.
Keep reading about D365 tips and tricks here: https://markedcode.com/index.php/category/d365/


